


| | |
![]()
![]()
![]()
![]()
![]()
![]()
![]()
![]()
![]()
Gemulator
9
Updated
November 30 2008 by Darek Mihocka
Run classic Apple Macintosh, Atari ST, and Atari 8-bit software!
When released in September 1992 at the Glendale Atari Fair in California, "Gemulator" was the world's first Atari ST emulator for the PC. Written in almost nothing but 486 machine code, Gemulator 1.0 was capable of running Atari ST software at full 68000 speeds on Intel 486 based MS-DOS computers. Gemulator was upgraded in 1993 to add emulation of Apple Macintosh Plus computers running Mac System 6. This was followed in 1995 with releases to run on Microsoft Windows 3.1 and Windows 95. In 1998 we added support for Windows 98 and NT 4.0, and spun off a sister product called "Gemulator SoftMac" (or simply as "SoftMac") which added the ability to emulate 32-bit color Mac models such as the Macintosh II and Macintosh Quadra. On November 30 2008, Gemulator 9.0 was officially released, supporting a built-in 68000/68030 debugger, improved compatibility with Windows Vista and recent multi-core 64-bit processors.
Download Gemulator (releases and betas)
Hardware and Software Requirements
All versions of Gemulator released since 1992 share a common set of features:
520ST/1040ST hardware emulation.
Motorola 680x0-series CPU emulation.
512K to 4M of emulated Atari ST memory.
ST Low (320x200 16-color), ST Medium (640x200 4-color), ST High (640x400 monochrome) graphics support.
Modem, printer, and sound support
720K and 1.44M floppy disk support, able to read Atari ST formatted floppies
Atari ST hard disk support (via VHD disk image files)
Mouse and keyboard support
Support for TOS 1.0, TOS 1.2, TOS 1.4, TOS 2.06, and MagiC
With all versions of Gemulator, you can run most of the major desktop publishing, graphics, word processing, and finance software written for Atari ST computers. For example, you can edit and run your GFA Basic programs, run Pagestream and print your documents, run Calamus SL and print your documents, query your Data Manager ST databases, write documents with Word Writer ST, draw graphics with Degas Elite, run some old Macintosh software using Magic Sac, and most other things you do on an Atari ST computer.
Windows-hosted releases of Gemulator add additional capabilities that go beyond those of the original MS-DOS version:
STE emulation, support for STE-only TOS (TOS 1.6, TOS 1.62, and TOS 2.05)
800x600, 1024x768, 1280x1024, and 1600x1200 video modes
Full screen and windowed modes of operation
up to 14 megabytes of Atari ST memory
Support for very large hard disk partitions, CD-ROMs, and network drives
external SCSI hard disk support
Easy-to-use point and click configuration
Black and white Macintosh Plus emulation with support for System 6 and System 7
Gemulator 9 and Gemulator SoftMac releases add these Macintosh related features:
Selectable 68000, 68010, 68020, 68030, and 68040 emulation
68881/68882 floating point co-processor emulation
Apple Macintosh II, Macintosh IIci, and Macintosh Quadra emulation
Built-in 68000 debugger and third party debugger support
Support for the open source Atari TOS ROM clone known as "EmuTOS"
Gemulator's main limitations are that copy protected floppy disks are not supported, MIDI ports are not supported, and timing dependent software is not supported. For example, programs such as Spectrum 512 which run only on 8 MHz Atari ST models, but not on 16MHz STE or 32 MHz TT models will not run on Gemulator either. This is because Gemulator typically runs much faster than the standard 8 MHz speed of an ST.
For specifics about running Macintosh applications and Mac OS, please see the SoftMac page.
Gemulator takes advantage of the higher graphics resolutions available in your PC's video card. In addition to emulating the 3 standard Atari ST screen resolutions (320x200 in 16 colors, 640x200 in 4 colors, and 640x400 monochrome) Gemulator also supports 640x480, 800x600, 1024x768, and 1280x1024 in monochrome and 16-color modes. Note: Gemulator Classic is limited to a maximum 640x480 resolution.
Gemulator can emulate a 520ST, a Mega ST 4, or a MegaSTE with up to 14 megabytes of memory (8 megabytes on Gemulator Classic for MS-DOS). The amount of memory being emulated can be set at 512K, 1 meg, 2 meg, 4 meg, 8 meg, or 14 meg, and can be changed at any time while running Gemulator.
Access your Atari single sided 360K, double sided 720K, and high density 1.44M floppy disks, as well as 800K disks and boot disks. Gemulator can even read those old TOS 1.0 formatted floppy disks that PCs normally can't read.
Note: Copy protected floppy disks are not supported. Windows 3.1 and Windows NT do not support the TOS 1.0 formatted disks.
Gemulator 2000 also automatically accesses all the hard disk partitions and CD-ROM drives connected to your PC. Earlier versions of Gemulator required setting up separate Atari ST hard disk partitions, and while this is still an option it is no longer required. Gemulator automatically takes care of large hard disk partitions, Stacker and DoubleSpace partitions, and other hard disk formats that TOS did not originally support.
That's right: Gemulator 2000 eliminates GEM's 32 megabyte partition size limit!
As mentioned earlier, Gemulator is not only a complete 68000 emulator, but it also emulates all of the special hardware chips used inside Atari ST computers. This includes the video chip, so that programs which write directly to screen memory run just fine. NVDI 4, Warp 9, Quick ST 3, Turbo ST, and other screen accelerators are fully supported.
Atari programs can access any printer or modem that Windows supports. You can switch between them on the fly, by specifying which COM port and which LPT port to use as the Atari modem and printer ports. On Gemulator 96, modem baud rates beyond 19200 baud are also supported, including 28800, 38400, 57600, and 115200 baud.
Gemulator supports a combination of plug-in hardware called the "Gemulator ROM card" which holds actual ROM chips, ROM BIOS image files which contain "ripped" BIOS ROMs in a disk file, and disk based operating systems such as Atari's TOS 1.0, the TOS replacement "Magic", and various release of Mac OS.
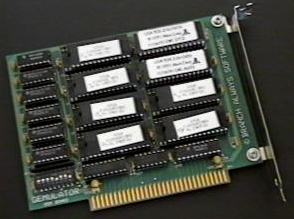 The hardware portion is an 8-bit ISA card that includes the Atari ST or STE TOS ROMs. The card plugs into any empty ISA slot in your PC or docking station. One or more sets of Atari ST or STE TOS ROM chips and/or Apple Macintosh Plus ROM chips must be plugged in to the card to operate, since it is these ROMs that contain the boot code to an Atari or Macintosh operating system.
You can eliminate the ROM card and real ROMs by using what are called ROM image files. These are ROM dumps created on your real Atari ST or Apple Macintosh computer. In place of Atari ST ROMs you can also use a TOS compatible Atari ST operating system such as MagiC 2, MagiC 4, MagiC 5, KAOS TOS, or an early disk release of TOS 1.0 or TOS 1.4. A TOS ROM image file should be named TOS.IMG and placed in the same directory as the Gemulator program.
 Up to four 2-chip sets of TOS ROMs may be plugged in to one Gemulator card, or a combination of one 2-chip and one 6-chip set of ROMS as shown in the picture. You may also plug in a 2-chip set of 64K or 128K Mac ROMs which can be found in old Magic Sac and Spectre cartridges.
Up to 50 sets of ROM BIOSes can be installed simultaneously in your PC, using a combination of one or more ROM cards and ROM image files. Up to 8 ROM cards can be plugged in to one computer at once provided there are enough ISA slots available.
If you do not have a way to create a ROM image file, you will need to obtain a ROM card and populate it with your own ROM chips. The ROM card can accept all types of Atari ROMs from the 520ST, 1040ST, 1040STE, Mega ST, Mega STE, Macintosh 512, and Macintosh Plus. The card also accepts other ROMs which are not supported by Gemulator 2000 directly but can be used by SoftMac 2000 and other emulators.
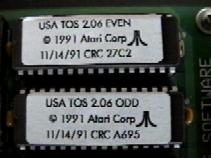
The TOS ROMs come in sets of 2, 4, and 6 chips, in either 28-pin or 32-pin packages. If you don't have loose ROMs but have an Atari computer, unscrew the cover from your Atari and find the ROMs on the motherboard. If your Atari ST computer has a 6-chip set of 28-pin ROMs, those can be used, as can 2-chip sets of 32-pin ROMs from an Atari STE or Mega STE computer. Each ROM will either have a part number stamped on, or have a label taped on top. The following is a list of North American Atari TOS ROMs and part numbers that we've cataloged so far that we support.
| Model and TOS version | ROM chips | Pins | Part number or label |
| 520ST/1040ST TOS 1.00 | 6 | 28 | C026162 0152 C026165 0155 C026161 0151 C026164 0154 C026160 0150 C026163 0153 |
| 520ST/1040ST/Mega ST TOS 1.02 | 6 | 28 | C101646 C101649 C101645 C101648 C101644 C101647 |
| 520ST/1040ST/Mega ST TOS 1.04 | 6 | 28 | C300789 H0 C300792 L0 C300788 H1 C300791 L1 C300787 H2 C300790 L2 |
| 1040STE TOS 1.60 | 2 | 32 | C301163-001 C301164-001 |
| 1040STE TOS 1.62 | 2 | 28 | C301163-002 C301164-002 |
| Mega STE TOS 2.05 | 2 | 32 | TOS MEGA STE C3020108 C3020109 |
| Mega STE TOS 2.06 | 2 | 32 | USA TOS 2.06 EE USA TOS 2.06 EO |
| Atari TT TOS 3.06 | 4 | 32 | C301925 C301926 C301927 C301928 |
Atari TT ROMs come as a 4-chip set of 32-pin ROMs. Those ROMs will be supported at some future time.
Some Atari ST ROMs come as a 2-chip set of 28-pin ROMs. Those ROMs are not supported at this time due to differences in pin layout of those particular ROM chips used.
Macintosh 512 and Macintosh Plus ROMs come as a 2-chip 28-pin set and are supported. 4-chip sets of Macintosh ROMs (Macintosh II and higher) require using SoftMac 2000 or later. See the Macintosh ROM Chart for a list of compatible Mac ROMs.
Software Requirements
Gemulator 2000 runs on all DirectX compatible versions of Windows - Windows 95, Windows 95 OSR2, Windows 98, Windows NT 4, and Windows 2000. It runs on all Intel 486 compatible 32-bit processors (486, Pentium Classic, Pentium Pro, Pentium MMX, Pentium II, Pentium III, AMD K6, AMD K7 Athlon). Gemulator is Pentium optimized and mostly written in Intel assembly language to provide up to 5 times the speed of other Atari ST and Macintosh Plus emulators, and runs up to 50 times faster than real Atari ST and Macintosh Plus computers.
Gemulator 2000 supports disk images, both for floppy disks and hard disks. Use .ATR, .XFD, .ST, .MSA, .DSK, .IMG, .VHD and other disk image formats directly with Gemulator! Gemulator 2000 also supports direct connection of Macintosh and Atari SCSI devices such as ZIP disks, Jaz disks, and CD-ROMs via the PC's SCSI bus.
DirectX
DirectX is a set of 32-bit graphics extensions for Windows that allows for on-the-fly graphics mode switching and allows Gemulator to run in full screen mode. If you are using Windows 98, Windows NT, and Windows 2000, you already have DirectX installed. Only if you are still using Windows 95, do you need to install DirectX. To do that, download it directly from Microsoft’s ftp and web site: http://www.microsoft.com/directx.
To figure out exactly what version of Windows you are running, select the Help menu in Gemulator and click on About.
While using Gemulator you switch to full screen DirectX mode by pressing Alt+Enter or selecting the Full Screen option.
Virtual Memory
Gemulator 2000 requires about 2 megabytes of Windows memory to run in, plus any memory allocated for emulation. Make sure that you have enough swap file space on the hard disk to allow Windows to create as much virtual memory as necessary. For example, when emulating a 4 megabyte Macintosh Plus, you will need about 6 megabytes of swap file space.
The faster your PC's processor, the faster Gemulator runs. Which processor you should use depends on how fast you need for your Atari software to run.
For 1040ST and Mega ST speed of operation, we recommend using a 486/33 or 486/50 processor. For Falcon or TT speed of operation, you will need to use a 75 Mhz or 90 Mhz Pentium as a minimum. Faster Pentiums scream.
These recent screen shots taken with Gemulator 96 (ok, we haven't updated this for Gemulator 2000, just know that the numbers will be faster!) show Gemulator running at blistering fast speeds on a 200 MHz PC. The screen shot on the left is using regular TOS 2.06 ROMs. The screen on the right shows the same benchmarks when using the MagiC operating system. If you have a newer PC running at 500 MHz or 800 MHz, your speed will be proportionally faster!
15 times faster than an original Atari 1040ST!
Gemulator runs almost 100% of ST and STE software at full Atari ST speed or faster. Only copy-protected and timing dependent Atari programs are not supported - programs that typically also do not run on Mega STE, Falcon, or TT computers either, or programs that make use of MIDI or joystick ports. Most MIDI programs in particular are heavily copy protected, which has made it difficult to add this feature.
Popular Atari programs that have been tested and run on Gemulator include:
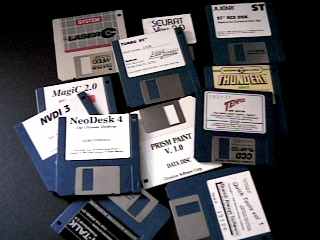
Calamus / Calamus SL
Pagestream 2.1
GFA Basic
Tempus / Tempus II
Word Writer / First Word Plus
Atari Works
Multi Writer
Flash! / Flash II
Megamax C / Laser C
Neodesk 4
Quick ST / Warp 9 / NVDI
MagiC operating system
Data Manager ST
Phasar
Speedo GDOS
and many more.
Please note. This is NOT a complete compatibility list by any means. Nor do we even maintain such a list since we cannot possibly purchase and test each and every Atari ST program ever written. Our testing, and user feedback, of hundreds of different Atari ST and STE programs has confirmed that most compatibility problems are due to copy protected or timing dependent software.

Gemulator is ideal for running Calamus SL and Pagestream, because it offers the ability to load your existing desktop publishing documents on Windows 95, to use 1600x1200 graphics, and to use up to 14 megabytes of Atari ST memory doing it. Such a system using real Atari TT computers would cost about $3000. A Pentium based Windows 95 system capable of running Gemulator with these capabilities costs half as much.
The Gemulator 2000 can be downloaded from our download page and comes in two ZIP files called GEM2000.ZIP and GEM2000X.ZIP. All users need to download and install GEM2000.ZIP or run our new unified setup program. Existing Gemulator users need not download GEM2000X.ZIP, which contains support files which you already have with your older Gemulator releases. Once you extract the ZIP files you will end up with these files:
GEMUL8R8.EXE - The Gemulator 2000 emulator
BIGDISK.DSK - sample Atari ST hard disk image formatted as two 60 megabytes C: and D: drives
80MEG.DSK - sample Atari ST hard disk image formatted as a single 80 megabyte C: drive
QINDEX22.PRG - Quick Index 2.2, Atari ST benchmark utility
SYSINFO.PRG - SysInfo utility for the Atari ST, displays useful information about TOS
INSTMAG2.BAT - Installation script for MagiC 2 (Atari ST TOS clone, requires your original Magic 2 disk)
INSTMAG4.BAT - Installation script for MagiC 4 (Atari ST TOS clone, requires your original Magic 4 disks)
VGAWIN.PRG - Screen driver for 1600x1200 video support (works with TOS only)
WINSIZER.PRG - Alternate high resolution screen driver
NOTE: Disk images of older versions of the Apple Macintosh System software (up to version 7.0.1) can be downloaded directly from Apple's web site. Select the Apple Software Updates menu in Gemulator to go to their site.
GEMULATOR 9 BETA TESTERS: If you have downloaded a beta release of Gemulator 9 the executable file will be named GEMUL8R9.EXE. Copy it to the same directory as the other files and run it in place of GEMUL8R8.EXE where instructed to below.
The next step is to install one or more Atari ST and/or Macintosh Plus BIOS ROMs. Gemulator is capable of running any of these Atari ST ROMs and operating systems:
It also supports 64K (Macintosh 128/512) and 128K (Macintosh Plus) ROMs and ROM images (VMAC.ROM). Other Apple Macintosh ROMs are also supported but it is suggested that you use them with the SoftMac emulator for fastest performance.
Once you've downloaded and extracted Gemulator, you will most likely fall into one of these categories of users:
If you are already running Gemulator Classic
Gemulator Classic refers to the MS-DOS versions of Gemulator (versions 1.0 through 3.60). If you are currently running this version of Gemulator, then you already have a Gemulator card with ROMs installed. Extract the latest Gemulator into your existing Gemulator Classic install directory and run GEMUL8R8.EXE from Windows. If you have virtual disks set up that you wish to you, use the Disk Properties dialog to point Gemulator at the .VHD files. Use the First Time Setup dialog to install the ROMs on your Gemulator ROM card.
If you are running Gemulator 95/96/98/99
If you are currently running Gemulator 95 or higher, then again all you need to do is extract into your existing Gemulator install directory and run GEMUL8R8.EXE. To import your existing Gemulator settings, click on the Import Settings menu and load the GEM98.INI file from your main Windows directory.
If you have MagiC 2 or MagiC 4
If you don’t currently own Gemulator but are using the MagiC operating system on your Atari computer, then you need to install MagiC on your PC. This can be done either manually or using one of the supplied batch files.
To use the batch files, first determine which version of MagiC you own. MagiC 2 comes on a single floppy disk while MagiC 4 comes on two disks. Both install to your hard disk the same way. In the root of your PC’s C: drive you need the file MAGIC.RAM which contains the MagiC operating system. You also need a folder called GEMSYS which contains support files for MagiC, such as the desktop program. Use one of the two batch files INSTMAG2.BAT and INSTMAG4.BAT to install MagiC 2.0 and MagiC 4.0 respectively. You will be prompted to insert the MagiC master disks and in a few seconds the installation will be complete.
To manually install MagiC, or if you have some other version of MagiC, copy the MAGIC.RAM file from your MagiC installation disk to your C: drive. Create a folder called GEMSYS and within that folder create another folder called GEMDESK. From the MagiC installation disk, copy the files GEMDESK.APP, GEMDESK.RSC, and GEMDESL.RSC to this GEMDESK directory. If using MagiC 4.0, you also need to copy the file OFF002.OSD.
If you wish to run Gemulator and MagiC from a floppy disk, install MagiC to your hard disk as described, then copy the MAGIC.RAM file and GEMSYS folder to a blank 1.44M floppy disk. Finally, copy the GEMUL8R8.EXE program to the floppy. You now have bootable Gemulator floppy disk that you can carry with you and run on any computer without having to re-install any files on that computer.
If you have MagiC PC
If you downloaded the MagiC PC demo or purchased MagiC PC, you follow a similar procedure as for installing MagiC. Instead of MAGIC.RAM, the MagiC PC operating system is contained in a file called MAGIC_PC.OS. Copy that file to the root of your PC’s C: drive. Copy the entire GEMSYS folder from your MagiC PC disks to your PC’s C: drive as well.
If you are running the MagiC PC demo, you will first need to run that demo to copy the GEMSYS folder from their virtual demo disk to a real floppy disk. Then exit MagiC PC, and use Windows to copy that GEMSYS folder to your C: drive.
If you are running the real MagiC PC, the files have already been extraced to your PC's hard disk, typically to a directory called C:\MAGIC_PC\MAGIC_C. Copy the MAGIC_PC.OS file and GEMSYS folder from that directory to your C: root directory.
If you have TOS on disk
Several versions of TOS were released on floppy disk. The original pre-ROM TOS 1.0 shipped with the first 520ST computers, and the TOS 1.4 developer release, as well as the KAOS TOS modifications. Both these disks contain a file called TOS.IMG (or KAOSTOS.IMG). Copy this file to your PC's C: root directory.
If you have no other TOS ROM or TOS on disk
As of February 2008, there is an excellent TOS alternative freely available as open source. The TOS clone "EmuTOS" is available for download from the EmuTOS web site. We recommend downloading EmuTOS release 0.8.3 or higher and using the 256K ROM image file, which is comparable to TOS 2.06. For English systems, the particular file is called ETOS256US.IMG, for French systems it is called ETOS256FR.IMG, as so forth. Copy the appropriate image file to the directory where Gemulator is located prior to running Gemulator for the first time, such that Gemulator can automatically detect EmuTOS and use it.
If you have MAGIC SAC or SPECTRE GCR
Gemulator can directly boot and run using your Magic Sac and Spectre GCR Macintosh ROMs and boot disks. Simply install the Macintosh ROMs into the Gemulator ROM card, and use your 400K or 800K Mac boot disk to boot from.
If you are running vMac
If you are a user of vMac, the other free Macintosh Plus emulator by Phil Cummins, extract Gemulator to a VMAC directory on the hard disk and place your VMAC.ROM image file and any Macintosh disk images files into that directory. Then run First Time Setup to detect the Mac ROM image file, and run Disk Properties to mount the disk image files.
The very first time that you run Gemulator you may be prompted with a First Time Setup dialog box. This is a one time procedure that tells Gemulator what port address the ROM card can be found at, and whether to scan the hard disk for disk based versions of TOS and any ROM image files. Gemulator will search for Atari and Macintosh ROM image files in the same directory as Gemulator itself.
Assuming that the ROM card is at address $240, you can select the Search ROM Cards option then click the Search button. If you have installed MagiC or TOS on floppy onto the hard disk, also select the Search Hard Disk option. If no ROMs get detected, click on the Settings button. You will get the ROM Card Settings dialog.
Make sure that the port address is set correctly and that the switch settings shown in the dialog match the settings on the card. When the address is correct, click the Scan button. The contents of each ROM socket will then be shown. Make sure that TOS ROMs do not appear in the wrong order or that sockets that contain ROMs don’t show as empty. If they do, shut off your computer, take out the Gemulator ROM card, and check that you installed the ROMs correctly.
Click Close to return to the First Time Setup dialog. When ROMs and/or ROM images are being detected, click the Close button again.
The next step is to customize Gemulator using the Properties dialog box. This dialog contains the important configuration controls for Gemulator. It works just like any other Windows dialog. You can get directly to this dialog by pressing Alt + F11.
When you have made your changes you can activate them by clicking on the OK button; if you want to abandon your changes click on Cancel. Click on Save to save the current set of Gemulator settings to disk. They will be the default settings next time you run Gemulator.
The following is a description of each of the various properties:
Full Screen
This option activates DirectX full screen mode, allowing Gemulator to occupy the entire screen. Turn off this option to run Gemulator 98 in a window. Use the keyboard shortcut Alt+Enter to switch between windowed and full screen modes. Do not use Alt+Tab or Ctrl+Esc to switch away from full screen mode as this does not work with all video drivers.
Zoom Mode
Stretches out screen pixels to fit more of the screen. This makes it easier to see low resolution screen modes, at the expense of slower screen redraws, since smaller windows redraw faster. Atari 8-bit mode uses this to select 320x240 or 512x384 full screen mode size.
New in Gemulator 2000: you can now toggle zoom mode on and off with your mouse. Simply click the maximize box in the top right corner of the Gemulator window, or double click the Gemulator window title and the window will change size!
Monitor
Selects what type of monitor to emulate, color or monochrome. Macintosh mode is currently limited to monochrome only.
Memory
The current setting for the amount of RAM being emulated is shown here. To change the RAM to be emulated just click on the required value.
Sound
This option emulates sound You must have a Windows compatible sound card. Activating sound slows down overall emulation speed.
Blitter
Select this option to emulate the functions of the Atari ST BLiTTER chip. When this option is selected you can activate and deactivate the Blitter from the GEM desktop Options menu.
BETA USERS: The blitter emulation in Gemulator 9 will automatically kick in when running TOS 1.06 and higher.
Joystick
Activates joystick support in Atari 8-bit and Atari ST modes.
OS
This listbox determines which version of Atari or Macintosh ROMs to install and run. Use this to switch between multiple ROM versions.
Cartridge
If you installed 64K Macintosh ROMs into the Gemulator ROM card, activate this option to install those ROMs as an Atari ST cartridge.
You can then run an Atari ST based Macintosh emulator (such as Magic Sac) to run old Macintosh software in Atari ST mode. Also used to toggle Atari BASIC on and off in Atari 8-bit mode.
If you have 128K Mac ROMs (Spectre GCR ROMs), you should not use this "Mac emulator on Atari ST emulator" feature, just directly emulate the Macintosh since Spectre GCR had many limitations that Gemulator does not. Switch to Macintosh Classic emulation mode to run your Macintosh ROMs.
Atari Disk Mode / Windows File Access
By default, Gemulator maps all of the PC’s drive letters to the same Atari ST drive letters. This removes the old Atari 32 megabyte partition size limit and allows you to access any drive that Windows can see, including compressed drives, CDs, and network drives.
Some older Atari software doesn’t run in this mode and needs to use dedicated Atari virtual disk partitions. In fact, earlier versions of Gemulator used virtual disks exclusively. The file CDRIVE.VHD is a virtual Atari C: hard disk partition.
Activating the Atari Disk Mode option helps these programs run better. Atari Disk Mode is also required when accessing non-MS-DOS formatted floppy disks.
BETA USERS: Gemulator 9 and recent release of Gemulator and SoftMac label this option as "Windows file access". It has the opposite meaning, in that enabling this option gives the emulated operating system direct access to your PC's drives.
Boot Disk
Use this option to select the disk that TOS boots from. For example, if this option is set to A: then Gemulator will look for an AUTO folder and desk accessories on the floppy; C: looks on the hard disk.
In Macintosh mode, this setting determines which SCSI device is the default boot disk. Any of the 7 Macintosh SCSI disk devices can be selected, or set it to Default if you wish to boot from floppy. A booth Mac OS floppy disk in the disk drive will override this setting also.
Disk Properties...
This brings up the Disk Properties dialog box, which you can also get to directly from the main menu and also by pressing Shift+F11.
This dialog box selects the mapping of floppy disks, disk images, and SCSI devices to the emulated drives.
In Atari ST mode, unless you have the Atari Disk Mode option selected, don't bother setting Disk Properties. When you do select Atari Disk Mode, you are now emulating the Atari drives instead of using your PC's hard disk partitions. You will typically want to leave the floppy mapped to A:, and map the various SCSI devices to the CDRIVE.VHD, BIGDISK.DSK, 80MEG.DSK, or other disk image files.
In Macintosh mode, you should leave the first floppy mapped to the real A: disk. Optionally map the second floppy to a vMac disk image file. Map the 7 SCSI devices to real CD-ROM and DVD-ROM drives on your PC, to your vMac or Fusion disk image files, or to real SCSI devices if you have a SCSI card installed.
You also have the option to "write protect" a disk by setting it to be read only.
New in Gemulator 2000: we have totally redesigned the Disk Properties dialog box to make it easier to use. We've eliminated a lot of mouse clicks that were required before in Gemulator 98. You can simply double click on a disk device to bring up the disk image selector. Any changes made are now instantly made instead of having to click on a "Change" button as before.
When booting in Macintosh mode, make sure that at least one of the Mac disk drives is configured with a bootable disk image or device. SCSI devices such as Mac formatted CD-ROMs, Mac ZIP disks, and even external Mac hard disks can be booted from and accessed.
Exiting Gemulator
Gemulator can be terminated in several ways:
Using the Windows mouse pointer and click on the close box, that big X in the top right corner of the Gemulator window.
If you have a Windows keyboard, press the Menu key to bring up the Gemulator main menu and either press Alt+F4 or click on Exit.
If you have a regular keyboard, press Control+F11 to bring up the Gemulator main menu then press Alt+F4 or click on Exit. All unsaved work will be lost, so it is best to do this from the Atari ST desktop when no programs are running or one the Mac OS has been shut down.
It is very important (to avoid disk corruption) to always properly shut down the Macintosh Finder. Only exit Gemulator or switch modes when the Mac OS has shut down.
Mouse Pointers
Since both Atari ST and Macintosh use graphical operating systems that make use of the mouse, it isn’t possible for both them and Windows to have control of the mouse at the same time. When you first start Gemulator you will find that you have two mouse pointers on screen! The working one will be the Windows mouse; the second, stationary, one is the emulated computer’s mouse.
In order for Gemulator to get control of the mouse, click the Windows mouse pointer anywhere on the Gemulator window. If you need to get the Windows mouse pointer back, simply press the F11 key, or press both mouse buttons at the same time.
The Atari ST mode supports these keyboard shortcuts for mouse actions:
Alternate + cursor keys Move mouse
Alternate + Shift + Cursor keys Fine mouse movements
Alternate + Insert Left mouse button
Alternate + Home Right Mouse button
Special Keystrokes
The following keystrokes have special meaning in Gemulator:
Ctrl+F11 Brings up the Gemulator main menu dialog
Alt+F11 Brings up the Properties dialog box
Shift+F11 Brings up the Disk Properties dialog box
Ctrl+F12 Reboots the emulated computer
Alt+F12 Reboots and switches modes
Shift+F12 Reboots and switches monitor types
F11 Shows the Windows mouse
Page Up Atari ST Help key
Page Down Atari ST Undo key
Home Atari ST Clr Home key
Alt Macintosh command key (Apple logo key)
Ctrl+F10 Switches Atari 8-bit mode (800, XL, XE)
Shift+F10 Toggles Atari 8-bit BASIC cartridge
F10 Atari 8-bit System Reset key
Atari ST TOS 2.06
TOS 2.06 is the latest, fastest, and least buggy version of Atari ST and STE TOS produced by Atari. It also has some new features not found in TOS 1.0, TOS 1.04, TOS 1.6, or other earlier versions of TOS. Icons can be dragged to the desktop. Disk directories can be opened by pressing Alt and the drive letter. The desktop settings are stored in the file NEWDESK.INF instead of the older DESKTOP.INF.
If you have TOS 2.06 installed, the Atari ST desktop does not immediately show up. Instead, an Atari logo appears, followed by a memory test, followed by a 90 second countdown which shows a large black bar on the screen. This countdown was added to TOS to give hard disks time to spin up. Since your PC’s hard disk is already up and running, and your PC has already performed its own memory test, you can safely skip both the memory test and the countdown by simply pressing any key on the keyboard when you see the logo.
Once the GEM desktop is up, you can use the keyboard to open disk drive directories. Just press Alt and the drive letter at the same time.
If you have TOS 2.05 installed, the logo is not displayed but the countdown still takes place. Although you will see just a white screen during the countdown, you can just press any key to skip it.
Accessing Atari ST Formatted Floppy Disks
Old versions of TOS had a bug that caused them to format floppy disks incorrectly. This bug prevented IBM PCs from reading Atari floppy disks, even though Atari computers could read MS-DOS disks.
The problem was corrected in TOS 1.4 and later versions of TOS. However, you may still have some disks formatted the old way.
There are three ways to read information from such disks:
1. Format a blank disk on the PC and then use your Atari computer to copy the files from the old disk to the new disk. Once copied, reformat all your old disks.
2. Activate the Atari Disk Mode option in Gemulator 98. This will allow Windows 95 to read the Atari disks and you can then use the PC to copy the files from these disks onto freshly formatted disks. Note: this trick only works on Windows 95. Windows 3.1 and Windows NT are more picky and can only read real MS-DOS disks.
3. Use an Atari ST utility such as DC Formatter or MOSDOS to re-write only the boot sector on the floppy disk. This fixes the disk without reformatting or losing any information. We supply the utility MOSDOS in the UTIL folder of the Gemulator 98 program disk.
Atari ST Monitor Emulation
Gemulator supports the three standard Atari screen resolutions: 320x200 in 16 colors, 640x200 in 4 colors, and 640x400 monochrome.
VGAWIN.PRG is a system patch for TOS that provides support for screen resolutions from 640x480 up to 1600x1200. It works in the same way as the Atari Moniterm driver, the Overscan driver, and other similar high resolution screen drivers for Atari hardware.
VGAWIN.PRG must be run from the Atari AUTO folder. Simply create a folder called AUTO on your MS-DOS C: drive and copy the file VGAWIN.PRG from the Gemulator 98 program disk into this folder. Next time you reboot GEM, VGAWIN will be run as a part of the boot up process.
When VGAWIN.PRG runs your boot up sequence will pause with an options screen showing the various screen resolutions available. Select the screen resolution that you want using the main keyboard numeral keys (not the numeric keyboard) and VGAWIN will install its screen drivers and let your boot up proceed.
Launching Atari ST Applications
From the Atari ST desktop, double click on PRG, APP, TTP and TOS files to run Atari programs. You can also use the facilities in TOS 2.06 that allow you to run applications by pressing a function key or double clicking on a data file. If you run one specific application every time you run Gemulator then use the Auto loading feature in the Install Application dialog.
You can use your Atari ST desktop as your desktop for Windows, using it to copy files, move files, delete files, and even launch Windows programs from the Atari desktop!
Gemulator 98 has a special hook that allows it to run DOS and Windows programs from the GEM desktop. To activate this you must boot up the GEM desktop and click on Save Desktop in the Options menu. Then, using a text editor, edit the file C:\NEWDESK.INF (or DESKTOP.INF) and find these two lines:
#G 03 FF 000 *.APP@ @ @
#G 03 FF 000 *.PRG@ @ @
Immediately after those lines, add this line:
#G 03 FF 000 *.EXE@ @ @
This tells the Atari desktop to try to execute .EXE files. Gemulator will intercept them and get Windows to run the program instead. An application run in this way will appear in a Windows window, not in a GEM window!
Note: Clicking on Save Desktop will write a new NEWDESK.INF (or DESKTOP.INF) file that will overwrite your edited version. Make a backup copy of your INF file in case you accidentally erase it in this way. With TOS 2.06 you can use Read INF File to reload and then re-save the INF file; with earlier versions of TOS you will have to rename the backup INF file.
To run AUTO folder programs, create a folder called AUTO on your drive C (real DOS drive or Virtual drive) and put your Auto folder programs in the folder. If you are booting from floppy, remember to set the boot disk to A: in the Properties dialog.
Desk accessories (ACC files) with any required RSC files and configuration files should be copied to the root directory of drive C.
If you get locked into a boot sequence caused by incompatible or corrupt files just leave Gemulator by pressing F11, go to the Windows File Manager and delete or rename the offending file, then switch back to Gemulator and reboot GEM.
Other Useful Tips
VGA Cards and Drivers
The screen performance of Gemulator 98 is determined by the speed and efficiency of your VGA driver in Windows. For color modes, always use a 256-color (or higher) driver; 16-color drivers tend to be very inefficient, even in Windows 95. For monochrome emulation using a monochrome or 16-color VGA driver usually gives the best results.
It is worth trying the 65536-color and true color modes of your VGA card, different VGA drivers, and the different settings of your VGA drivers in order to find the best combination for your machine.
If you find that screen redraws are still too slow then you may consider upgrading or replacing your PC’s graphics card. Try to get a local bus VGA card or a "Windows accelerated" card. A slow VGA card will slow down emulation considerably.
One giveaway that the video card and/or driver is slow is if turning off the Fast Refresh options makes a significant difference. In that case, leave the Fast Refresh option turned off.
Install Devices (Atari ST mode)
To avoid having to install all your disk icons one by one, go to the GEM Options menu and select Install Devices. Once you've arranged the windows as you want them select Save Desktop.
SCSI Support
If you are running the original Windows 95 or Windows NT 4.0 (in other words, you are not running Windows 95 OSR2 or Windows 98) your SCSI drivers may be out of date. This will prevent you from accessing Macintosh and Atari ST formatted SCSI devices such as ZIP disks and CD-ROMs, or your machine may hang. You need to download the latest Adaptec ASPI SCSI drivers from Adaptec's web site at http://www.adaptec.com.
Multiple Gemulators
Don't forget that you can run multiple copies of Gemulator at the same time. Of course this uses up a lot of memory, so make sure you have enough swap file space and preferably at least 12 megabytes of physical memory before attempting this. Use the Import Settings menu command to load a different configuration into each instance of Gemulator to emulate different computers with different configurations all at once.
![]()
![]()
![]()
![]()
![]()
![]()
![]()
![]()
![]()
Apple, Mac OS, Macbook, Apple Silicon and Macintosh are registered trademarks of Apple Computer, Inc. Atari is a registered trademark of Atari U.S. Corporation. Athlon, Athlon XP, Opteron, Phenom, and Ryzen are registered trademarks of AMD. Arm is a registered trademark of Arm Limited. Microsoft, Windows, Windows NT, Windows XP, Windows Vista, Windows 7, Windows 8, Windows 10, Windows 11, Visual Studio, .NET, and/or other Microsoft products referenced herein are either trademarks or registered trademarks of Microsoft. Intel, Pentium, Core 2, Core i7, and Atom are registered trademarks of Intel. PowerPC is a trademark of IBM. Additional company and product names may be trademarks or registered trademarks of the individual companies and are respectfully acknowledged.