NO EXECUTE!
(c) 2012 by Darek Mihocka, founder, Emulators.com.
May 6 2012
Just a short quick posting tonight to give some updates on Bochs 2.5.1, Windows 8, Visual Studio 11, and Ivy Bridge before I dive back into them some more.
Windows 8 Beta and Visual Studio 11 Beta
No doubt you are aware that the Visual Studio 11 Beta was released along with the Windows 8 Beta back on February 29. I won't bore you with the usual summaries about Metro and apps for soccer moms.
I have installed Windows 8 Beta on no less than 6 machines at home here - on my 13-inch white Apple Macbook (clean install), on my 13-inch Apple Macbook Pro (upgrade from Windows 7), a recycled 1.3 GHz Pentium 4 (clean install), on one of my Sandy Bridge machines from last year (clean install), on the Samsung tablet (upgrade from Windows 7), and on the old 2008 era quad-core Intel Core 2 Q6600 box (upgrade from Windows 2008 R2 to Windows 8 Server). The good news is, on all 6 machines the install pretty much went without a hitch. I was especially surprised that Windows 8 installed to the Macbooks and pretty much just worked out of the box. Yes, you still have to put your Boot Camp drivers CD in to get the Bluetooth and a few other devices to work (at which point I was able to pair each machine to an Apple touch mouse no problem) but things like networking just worked.
Contrary to the stories you might have heard, the Start menu is not really gone. While the Start button in the lower left corner of the screen is now replaced by a link to the "Metro" screen, pressing Windows+Q on your keyboard brings up the Apps screen, which is your old Start menu rendered in two dimensions of tiles instead of as pop-down menu bars. Windows+D then brings you right back to your desktop.
A trick I use, same trick I use in Windows 7, is to "pin" an application to the taskbar the first time I run it. I pin Firefox, Outlook, Task Manager, Disk Defragmented, Windows Update, Word, Excel, etc. all to the task bar. So in effect you can make your Windows 8 desktop look almost identical in appearance and functionality as your old Windows 7 desktop.
You've probably seen screen shots of the new task manager, TM.EXE. The old classic Windows 2000/XP/7 Task Manager is still there, and is still TASKMGR.EXE. From a command prompt just run TASKMGR, then pin the task manager to the taskbar.
This whole Metro thing is new to me, as it is to all of us. I won't go into the various apps, but a few cool features worth mentioning especially on touch devices like tablets:
- If you move the mouse to the right side of the screen, or swipe your thumb across the right edge of a touch-screen, you'll get some icons showing. The middle one brings up Metro. This is how to bring up Metro without a keyboard. With a keyboard just press the Windows key.
- In the top right corner of the Metro screen if your login icon. Click that to bring up a security/shutdown menu just like with the old Start button. This menu allows you to lock the screen, to sleep, log out, or shut down the PC with a few taps.
- Typing a secure password on an on-screen keyboard is a pain, what with all the numbers and punctuation marks requiring multiple fingers. I hated that about Windows 7 on the Samsung tablet. So in Windows 8 you can create an iOS/Android style PIN to quickly unlock the screen. If you mistype the PIN a few times then it forces you back to painful password login. This makes it difficult for someone to try to brute force crack your PIN.
- My favorite feature is the ability to log in to Windows 8 using an existing Hotmail account. Instead of having to manually create a new user account for yourself on each machine and having to memorize even more passwords, just log in using your existing Hotmail account and password. This then automatically syncs your Hotmail inbox and other settings across devices. Not just for tablets, this is super handy for when you have multiple desktop machines as I do.
Windows 8 Beta by the way is similar to the Windows 7 Beta from January 2009 in that the download and installation is free. i.e. you do not need to purchase or burn a Windows activation code to play around with the beta. And if it is anything like the Windows 7 Beta, it probably won't expire. I presume that as I still have one machine here at home which is running the Windows 7 Beta for over 3 years now, still kicking just fine. So folks, if you are building a new machine or upgrading an old one, consider putting the Windows 8 Beta on it for grins.
One hint - do NOT do the easy online install of Windows 8 Beta as that wipes your existing installed applications. Instead, download the ISO, burn a DVD, and then from without your current Windows 7 run the SETUP.EXE on the DVD and choose the upgrade path.
Bochs 2.5.1 and building it with Visual Studio 11 Beta
In January, the Bochs 2.5.1 release was made, which contains support for all of the Sandy Bridge, Ivy Bridge, and upcoming Haswell instruction set extensions for AVX, AVX2, and BMI (Bit Manipulation Instruction, very cool stuff!). Not quite all of Haswell yet, as in February Intel announced the HLE and RTM instruction set extensions which bring lock elision and transactional memory to x86. There are very cool features which I will be writing about in some future postings, as HLE, RTM, and even the BMI instructions have direct applicability to speeding up simulators and emulators!
Since 2.5.1's release, additional performance optimizations have gone in to the Bochs tip-of-tree sources on sourceforge (http://bochs.sourceforge.net/), including a patch I submitted to improve the lazy flags mechanism even more (giving an overall 5% speedup), and a patch from Stanislav to cache address translation of stack pointer accesses which got another 5% or so.
Using a recent source snapshot (I'm currently synced to subversion checkin #11143) my reference machine (the good old 2006 era 2.66 GHz Apple Mac Pro used for the original Bochs work in 2008) is pushing upwards of 125 MIPS simulation speed, almost 5x faster than Bochs was barely 4 years ago. On my Sandy Bridge machine clocked at 4.43 GHz, I'm getting about 245 MIPS and on this new Ivy Bridge box clocked at 5.1 GHz, you heard right, 5.1 GHz, a cool 280 MIPS. More on that shortly.
One of the tricks I use to squeeze the last bit of performance out of Bochs is to build with Visual Studio C/C++ compiler instead of the gcc in Cygwin, and to use some specific compiler switches which the gcc does not support. For example, using LTCG ('link time code generation", also known as "whole program optimization", or "link time optimization"), using PGO (profile guided optimization), generating robust listing files (.COD files), and trying different optimization switches. The mechanism of running the "configure" script with gcc is messy enough with gcc let along trying to add custom switches for Visual Studio. So instead what I have used for a while, and which I'll share here, is a quick little wrapper script I simply call m.bat which I type in place of nmake to wrap nmake.
The wrapper script is here: m.bat, and although I have it as a text file here, save it as "m.bat" to the root directory of your Bochs source tree. To run it, first do the one-time Cygwin based configuration of running:
sh .conf.win32-vcpp
This creates the proper Makefile for use with Visual Studio's nmake tool. This is in fact how far I got you back in Part 30 during my last tutorial on how to configure and build Bochs with Visual Studio 2010. But I didn't go deeper into various compiler options, which we can do now with this wrapper script.
So now, instead of typing nmake, just type "m" followed by options such as cod, o1, o2, sse2, ia32, avx, atom, etc. for example:
m clean o2 sse2 cod ltcg
which in this example performs a clean build, optimizing for speed (-O2), optimizing for SSE2 instruction set (/arch:SSE2), generates source/assembly listing files, and uses link-time code generation to optimize across function calls. This is the standard configuration that I build Bochs with.
The script documents a few other options, such as optimizing for the Intel Atom processor, as Visual Studio 11 now supports a /favor:ATOM switch. I find that the Atom option slightly changes the instruction scheduling of compares and branches, as well as replacing LEA instructions with ADD instructions where possible, but otherwise the Atom option is fairly benign on existing "big core" processors such as Core 2 or Core i7 and so I recommend using it when the compiler supports it (i.e. VS11 but not VS2010).
Also new in Visual Studio 2011 - devirtualization works, and arch:IA32
In an even earlier postings I complained about a serious bug in Visual Studio 2008's optimization which "devirtualized" the main CPU dispatch code in Bochs into something like 30 "compare and branch" instructions in an effort to "optimize" away the indirect function call. This was a horrible mistake on Microsoft's part, as even on Sandy Bridge executing 30 pairs of compare-branch instructions is not going to be faster than the 25 or so cycles of a mispredicted branch. For an example of this code see: http://www.emulators.com/docs/devirt.txt. Visual Studio 2010 suffered from the same problem, which is why until now I have not used the PGO (profile guided optimization) feature in Visual Studio. It flat out slowed down Bochs.
I am pleased to say after experimenting with the Visual Studio 11 Beta, the devirtualization optimization is fixed. I now never see more than about 5 pairs of compare-branch, and usually only 1 or even none. The compiler is smarter about trying to unnecessarily get clever on indirect calls.
Devirtualization is handy in places where an indirect function target tends to have only one or two targets. And example of this is the indirect call that x86 instruction handler functions call to calculate an effective address. About 85% of the time, the function call i->ResolveModrm() will call the same function, which resolves the [reg+disp32] addressing mode. For a case where 85% of the time you can correctly predict the target with a compare-branch, you want the compiler to devirtualize. And looking at the generated code, the VS11 compiler not only devirtualizes these calls to i->ResolveModrm but even inlines the devirtualized function. That easily brings a few extra percent performance increase over plain LTCG. PGO finally works.
The other subtle change I've noticed in VS11 is that SSE2 is now the default code generation mode for 32-bit x86, just as it has already been for 64-bit x64. Previously in all other Visual Studio releases, the 32-bit compiler targets plain Pentium class x86 + x87 floating point code. To make use of SSE or SSE2 you had to specify /arch:SSE or /arch:SSE2 on the command line. Now, /arch:SSE2 is the implicit default, so to explicitly generate that Pentium class code to run on old Windows 95 machines, use the new /arch:IA32 compiler switch.
And of course if you are planning to directly target the new Sandy Bridge or Ivy Bridge processors, use /arch:AVX. Which brings me to...
Ivy Bridge
Just earlier this month the new batch of 22nm Ivy Bridge processors hit retail. And I of course immediately ordered one, ordering the Core i7 3770K processor and pairing it with an ASUS Z77-V Deluxe motherboard.
As I explained in detail in my previous posting last December, the Sandy Bridge architecture not only introduced the 256-bit AVX instructions to double the width of SSE operation, it also measurably improved the average IPC, or Instructions Per Cycle throughput of typical x86 code. As I explained then, in my measurements I was getting a minimum 15% performance increase at the same clock speed.
Ivy Bridge is the "die shrink" of Sandy Bridge, shrinking the size of transistors from 32 nanometers to 22 nanometers, and in turn reducing the power consumption of the processor. Less power means less cooling required, making it ideal for things like laptops and tablets where small size and battery life matter a lot. But it also means that with similar cooling you can squeeze out more CPU cycles for the same amount of heat and power. And in the 4 days since the parts arrived and I started building this machine, that is what I have been experimenting with.
The short story is - whereas I have been able to push Core 2 processors up to about 3.2 to 3.4 GHz before they overheat, and have pushed Core 7 Sandy Bridge to about 4.4 GHz, I have been reliably running this Ivy Bridge machine at 4.9 GHz. In fact after leaving the furnace off overnight and leaving windows open to get the house full of icy cold air (in Seattle here this week we've been about 50F/10C by day and toward freezing at night) I was able to run the box at 5099.5 MHz long enough to boot Windows and run Bochs and run a bunch of other benchmarks.
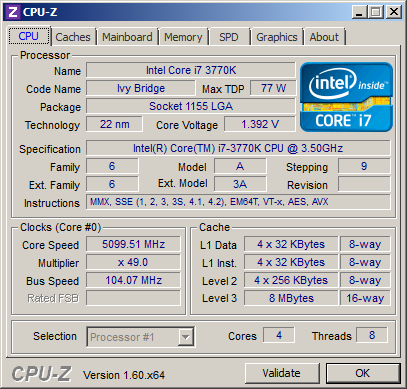
It is at this aaaaaalmost 5.1 GHz configuration that I was able to measure the speed of Bochs at 280 MIPS and boot the 6 billion instructions of my Windows XP test image in under 30 seconds. Compare this to about 245 MIPS and 33 seconds for the Sandy Bridge, and about 59 seconds and 125 MIPS for the Core 2 reference machine.
I say aaaaaalmost because literally I could not get the machine to clock any higher, I was just a few kilohertz away from 5.1 GHz. I tend to use a lot of ASUS motherboards because of the great tweakibility they offer. You can tweak the base clock (BCLK) frequency, you can tweak the CPU multiplier, and even do it in real-time using ASUS's tools. BLCK is normally 100 MHz even. Anything above 103 MHz I find tends to get unstable, which I why I run my Sandy Bridge machines at 103 MHz * 43 multiplier to get just over 4.4 GHz. The Ivy had no difficulty matching that same exact configuration:
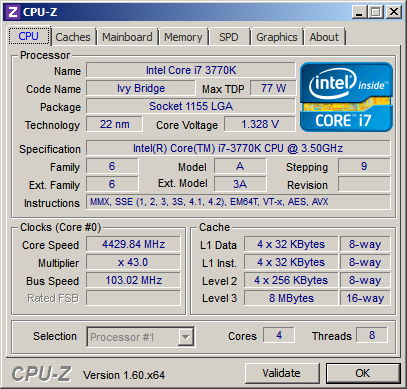
At this "slow" clock speed the CPU is running at about 30C to 40C, practically body temperature and thus plenty of room for over-clocking. Keep in mind that at 4.43 GHz this is already almost 1 GHz over-clocked, as the 3770K is a 3.5 GHz part! But as expected, 4.43 GHz is practically a cold chip.
Pushing above 103 MHz to increase the clock speed I found was a tad unstable on this Ivy Bridge, so instead I went for 102 MHz BLCK and higher multipliers. I was able to get up to 49x multiplier before hanging the machine trying 50x. So for the aaaaalmost 5.1 GHz run I left the multiplier at 49x and kept increasing the BLCK until I blue screened. This happened right at around 104 MHz BLCK. At this point the CPU temperature was shooting well over 80C despite three large case fans and the CPU fan running full tilt in the cold air of the house.
So experiment completed, I backed off the multiplier to 48x, and backed off the BLCK down to 102 MHz, giving me the stable 4.9 GHz at which the machine has been running at now quite well.
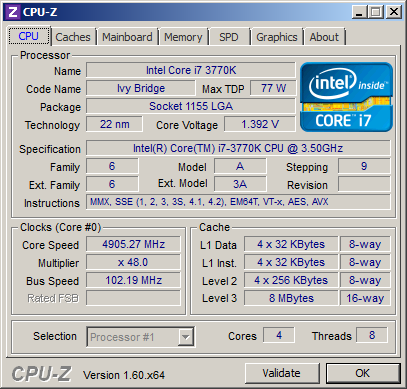
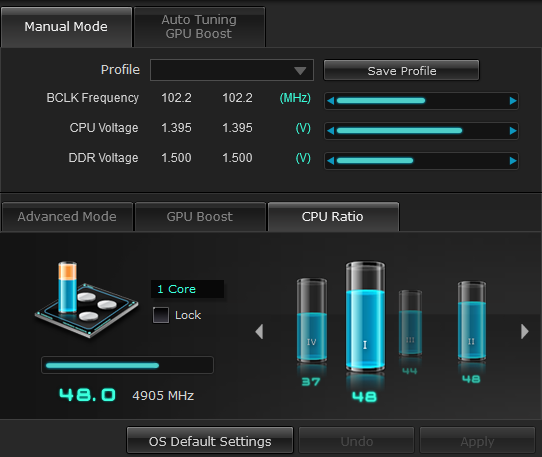
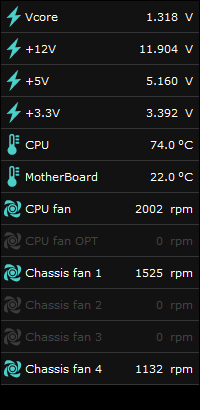
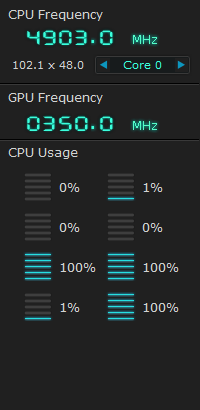
At this configuration with all 4 cores and 8 threads running, the CPU settles at about 74C to 76C, cool enough to not trip the 80C temperature alarm or to blue screen. As I said, ASUS makes very tweakable boards and has easy-to-use software you can tweak the settins with live, showing you the live CPU temperature, fan speeds, BLCK, and multiplier:
The Quirks of TurboBoost and Windows Thread Scheduling
One little problem I ran into, sometimes it was not possible to reach the maximum clock speed while running a benchmark. This turns out to be a side-effect of how TurboBoost works. TurboBoost is a feature added in 2008 with the introduction of the Core i7 processor which works kind of the exact opposite of SpeedStep on many laptops. SpeedStep slows down the CPU to slow clock speed like 800 MHz or 1.6 GHz when there is no load on the cores. For example when you Windows desktop is idiling. TurboBoost on the other hand cranks up the CPU clock speed when there is load.
TurboBoost can work in two ways:
- the simple locked mode, where all 4 cores are clocked at some higher speed. This can be problematic because if all 4 cores are under load the CPU might overheat. This is equivalent to basic over-clocking and is limited in the top clock speed. Earlier processors have generally been over-clocked this way.
- the unlocked mode, where the TurboBoost frequency varies based on how many cores are under load. The goal here is to maximize total CPU cycles of all cores without overheating. So as you can see in the screen shot above, the ASUS tool allows me to set the CPU multiplier individually for cases where only 1 core is under load, where 2 cores are under load, for three, and for all four.
One core under load (with three cores idling) means that you can push the clock frequency of that one core very high since the other three cores are effectively acting as heat sinks. I found with the Ivy Bridge I could have two cores under load at 4.9 GHz without overheating. With three cores under load, I have to reduce the multiplier to 44x (4.5 GHz) to stay within the 80C temperature limit, and with all 4 cores under load I limit the multiplier to 37x (3.79 GHz).
What is interesting, and you have probably seen this on your own Core i7 machines, is that the clock speed will tend to jump around from 37x to 44x to 48x which I am doing nothing but running a benchmark. The culprit was the Windows 7 thread scheduler. Windows keeps waking up cores (specifically, hardware threads) to run short idle tasks. If you bring up Task Manager on a Core i7, you will see 8 threads something like this:
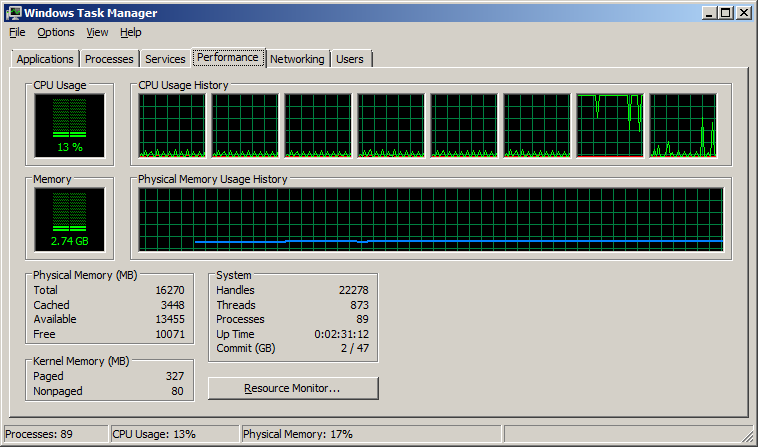 <- how NOT to schedule threads
In this case I took the screen shot as I was trying to benchmark Bochs. Notice how Windows mostly keeps Bochs pinned to thread #6 (the 7th thread in the Task Manager, corresponding to Thread #0 of Core #3). Once in while it moves the execution to thread #7 (the other hyper-thread of Core #3) which is OK, because both those threads belong to Core #3. Why it moves it between threads on the same core, who knows, but the bigger problem is what is happening on the other 3 cores / 6 threads. They are not idle! Stupid little background services keep waking up and running little bits of code and then going back to sleep. This keeps those 3 cores from truly idling, and keeps TurboBoost from giving me my 48x multiplier. Even though overall the machine is execute 1 core worth of real work, all 4 cores are being clock down to 37x multiplier.
In fairness, I have to say Windows 7 does a much better job than Windows XP, which seemed to do round-robin thread scheduling that kept moving a process from one core to another all the time. At least Windows 7 tries to maintain some thread affinity. But, in putting various background services and processes on the idle threads it's killing the overall performance. If this was on a laptop computer I'd have the worst of both worlds - slower clock speed, and lower battery life due to all 4 cores being active.
So what to do? I tried one rather brute force solution - I went into the BIOS and disabled one of the cores. In the BIOS you can actually force only 1, 2, or 3 of the cores to be enabled, in effect, turning the 3770K processor into a single-core, dual-core, or tri-core CPU. This actually worked. Booting Windows with 3 cores, I was now always running at least at the 44x multiplier, which is a start. In theory I could have limited the processor two just 2 cores and guarantee the 4.9 GHz operation all the time.
But my overall total potential clock cycles of work are lower if I start shutting off cores, as per this quick calculation:
| Active cores | Multiplier | Total headroom |
| 1 | 48 | 48 |
| 2 | 48 | 96 |
| 3 | 44 | 132 |
| 4 | 37 | 148 |
So another approach is to be smarter about thread scheduling. I rebooted back with all 4 cores active and did a few things differently:
- First, I launched Bochs using the start command to specify thread affinity of Bochs to a single thread, i.e. "start /affinity 80 bochs.exe -q". The "/affinity 80" specifies a hexadecimal bitmask of allowed threads to run on. 80 hex is the bitmask for thread #7
- Second, in Task Manager, under the Processes tab, I clicked on taskmgr.exe itself and set its affinity to the same thread #7. Similarly I set the affinity of the ASUS tool and of CPU-Z to thread #7. All three of these (CPU-Z, ASUS, Task Manager) are very low CPU utilization tools which I mainly have up on the screen to read the CPU clock speed and so they can be lumped onto the hardware thread of Bochs without really slowing down Bochs. But more importantly, to not have them waking up on other cores. i.e. the act of measuring the clock speed must not affect the clock speed!
- Third, in the same Task Manager Processes tab, I killed unnecessary background processes such as the nVidia display settings tool, the Adobe updater, etc. that really do not need to be active all the time.
Having done that, I then launched Bochs and got this beautiful result that I would expect - one CPU thread heavily loaded doing real work, the other 7 threads and 3 cores sitting idle and clock speed showing 4.9 GHz:
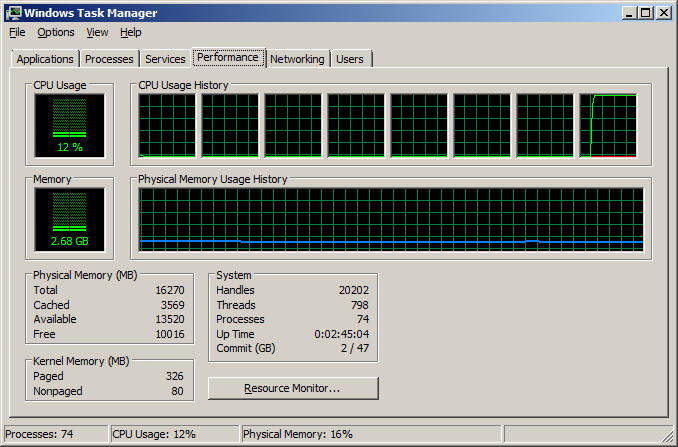
This simple attempt to just running a benchmark reliably and deterministically exposes a serious problem for tablets and laptops and even powerful workstations - low cycle background processes and trying to provide fair thread scheduling by the OS can really kill performance. To maximize performance and reduce power consumption under low load (like running a single threaded application or a bunch of low cycle services) you want the host OS to lump these guys all onto a small number of cores. Or at least give me the user some option to do so, perhaps when I specify the battery saving mode?
Lumping threads together to power down cores goes against the conventional wisdom of the whole point of multi-core processors, but
But the OS itself could be smart. Look at that first Task Manager screen shot which shows a total of 13% CPU utilization (i.e. 100% divided by 8 threads). The OS should be smart enough to realize when CPU utilization is well below say 50%, that half the cores can be halted into idle. Or in this case, all the work can be lumped onto the two hyper-threads of one core and 3 of the 4 cores put into idle state.
Does Windows 8 handle this better? I haven't checked, but certainly this is one cool trick that they still have time to pull off.
Just a reminder that the 2012 ISCA conference starting in one month in Portland Oregon. See you there.
Until next time, happy over-clocking!